Even though my primary job is as a BIM consultant, that doesn't mean I don't have things to learn from my clients...the architects and engineers I get to work with everyday! Primarily about workflow and streamlining processes between disciplines, especially when they are not in the same company (which so many are not). After numerous fruitful visits to engineering client sites the past few months, I found that they became even more successful when we also met with the architect on the project. Initially, my goal is to make the transition from AutoCAD to Revit as painless as possible, those of us that have been doing this for a while know that many factors define a smooth transition.
Even with basic training, the timing of that training is very important...too early before starting the first project, and you tend to forget what you learned...too little time before you start the first project and you don't have time to experiment, make mistakes, and ultimately feel comfortable delivering your model to your consultants. Training itself is important. Personally, I think it is important for clients to begin playing on their own, whether watching short videos, going through tutorials, or just being bold and experimenting with the software. But please, begin to enjoy it. Working in Revit can be fun, but if you have no desire to learn it and will have a bad attitude about it, please, don't start. I have found that the learning curve for anyone that doesn't want to learn it is longer...if you ever reach a comfortable place at all.
After you and your colleagues have had some time with it (making sure you are writing down questions and concerns as you go), have a meeting with your reseller. Talk about it. Ask questions...lost of questions. If you have a good service provider, their goal is not to sell you a bunch of boxes of software, but teach you to ultimately be self-sufficient...we have all heard the phrase "Catch a man a fish, he will eat for a day. Teach a man to fish, he will eat for a lifetime." the goal should be to teach you to fish. Next, have company specific training. Bring in a set of Construction Documents; make sure they know what your deliverables look like...because, let's face it, right now, that is the goal. The Little BIM. Getting your deliverables out the door.
Let your channel partners help you. As much as you, as an architect or engineer, love seeing your buildings built, standing strong and beautiful, I love when a client completes their first successful project in the Revit environment. And even more, when they come back to talk about expanding their services, using conceptual energy analysis, improving their workflow with their structural analysis software products, and pushing the limits with visualization. There is a reason I went into this business...and I am so happy I did! Hand over those lemons, I am way past making lemonade...
Showing posts with label Revit Platform. Show all posts
Showing posts with label Revit Platform. Show all posts
Saturday, October 22, 2011
Wednesday, July 27, 2011
Wednesday, July 6, 2011
Adding Symbols on Revit
When working in Revit, there will be times you will be required to add Symbols.
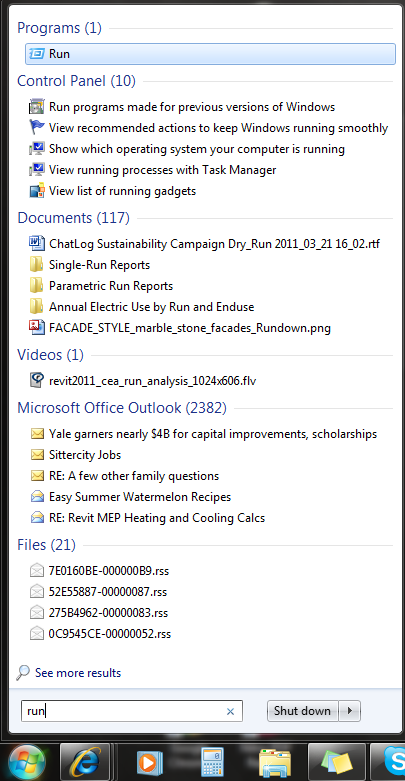
Go to the Start Menu and type in "run":
![]()
Type in "charmap":
![]()
The Character Map will pop up, and you can use it from there:
![]()
Note that Revit does use True Typefont...
Go to the Start Menu and type in "run":
Type in "charmap":

The Character Map will pop up, and you can use it from there:

Note that Revit does use True Typefont...
Monday, November 22, 2010
Something you have been waiting for!!!
Are you a manufacturer looking to create Revit content for your architects or engineers? Are you an architect or engineering working with a building product manufacturer creating their content in Inventor? Well, the time has come:
BIM FAMILY TOOLKIT
From the website:
OverviewThe BIM Family Toolkit Technology Preview allows building product manufacturers the ability to easily export Inventor configuration data from iParts and iAssemblies (parameters, file properties & component visibility) directly to Revit families. Once the family data has been imported into Revit, users can create a simplified version and leverage the imported parameters and properties directly in Revit reducing the amount of time it takes to create BIM Ready Models.
Watch videos from YouTube that will provide a snip of how you create a family, and how to share family data from Autodesk Inventor into Autodesk Revit.
It will now be easier to for building product manufacturers to work with the AEC community, and provide them with what they need...are you on board?
Monday, November 8, 2010
What comes first...the services or the software?
Just like the old saying, "what comes first, the chicken or the egg?" the same can be said about services and software. When it comes to the AEC community, the software is the tool that will assist in attaining the end goal; the people and workflow is what is going to make the end goal result in the most efficient manner. But there are so many companies that purchase Revit, or even the vertical AutoCAD platforms, for that matter, and then expect their users to pick it up like they did AutoCAD...but it really doesn't work that way...
Even if a company is embedded in the AutoCAD workflow, working in Revit is completely different. Even if you are not ready to embark into full out training, you should always work with your reseller to put together a plan of attack. Implementing Revit is a process, and requires planning. The question comes to whether you plan first, then buy the software, or buy the software then create a plan. Many buy the software first, then decide what do to...but is that the best plan? In my opinion, no.
Revit itself may not necessarily be the only software you need. If you are an engineer, 3DS Max may be a good add for lighting calculations. If you are an architect, Ecotect may be a good add for lighting simulation. If you are a contractor, NavisWorks may be the way to go. You won't know until you speak to your reseller and decide what your end goal is. Then put together a plan of how you are going to get there...this plan typically will have multiple parts, from start, to first project, to analysis and beyond...however...
...without training, here is my 2 cents, from my experience:
1) Practice, practice, practice...whether it be tutorials or working on a project you have already done in AutoCAD, then recreating it in Revit...or watching uTube videos...anything to learn will benefit you in the end.
2) Use your reseller for their experience. They have done this many times. Specific topics can be taught in a few hours, if not less. Make sure you are equipped with the knowledge to begin a project (creating a Central File, working with Worksets). Will you be working with multiple consultants? Make sure you are setting up your Coordinate System and your consultants know how to mirror them. There is so many ways your reseller can help you; utilize their abilities.
3) Will your Construction Documents be ready to go out when you need them to? Is the Font correct? Line Weights? Fill (Hatch) Patterns? You don't want to spend the time you normally go through coordinating your Construction Documents (which you no longer have to do), perfecting your deliverable.
4) What is the first phase of your new workflow? Are you simply looking to use Revit for the single file benefits and getting your Construction Documents out the door? That's okay...but make sure you are taking the steps to do that efficiently. A plan is the best way. Whether with your reseller, or within your firm, begin to plan your future as a BIM company.
This is just the beginning...
Monday, October 25, 2010

Tuesday, August 3, 2010
Revit Plug In for Bentley Export
Are you working with consultants requiring Bentley files? Bentley has come out with a Plug-In to assist you in exporting your Revit files to a Bentley environment, whether MicroStation, Bentley Navigator or Bentley BIM products. For more information, follow the link below:
Bentley Building Analysis and Design
*Not yet updated for Revit 2011.
Introduction to i-model plugin for Revit - Watch the demonstration
NOTE: I have not seen much response from clients on this, primarily the benefits/limitations. Most information is from Bentley advocates, but I have not seen anything from Autodesk themselves. This is for your information, only. Please be careful when applying the Plug-In.
Friday, July 30, 2010
Improving Building Design with a Sustainable Workflow Webinar
I will be presenting a webinar on Tuesday, August 31st at 9:00 am.
For those of you who currently own Revit Architecture 2011 Suite and/or Revit MEP 2011 Suite, you do have the ability to utilize Green Building Studion through your Subscription. For more information, log into the Autodesk Subscription site.
"Use Autodesk products to efficiently and effectively create more sustainable building designs. Whether a new or retrofit project, incorporate Revit, ImageModeler, Green Building Studio and Ecotect to improve the future energy cost of building projects."
RegisterFor those of you who currently own Revit Architecture 2011 Suite and/or Revit MEP 2011 Suite, you do have the ability to utilize Green Building Studion through your Subscription. For more information, log into the Autodesk Subscription site.
Thursday, July 16, 2009
Are you speaking to your manufacturers?
For many years, since Revit was purchased by Autodesk, there has always been a problem of the amount of content provided with the program. As it continued to grow, to include Revit Structure and Revit MEP, even though the amount of content increased, there are still complaints. That is truly understandable, especially with the creation of Revit MEP, and the number of manufacturer specific content needed for the creation of Construction Documents (primarily for the schedules). Engineers can create the content themselves, but, better yet, they can begin speaking to the manufacturers. Many manufacturers have already begun creating their own content, understanding the need changed currently occuring in the AEC industry.
AO Smith
Greenheck
Visa Lighting
Trane
York Equipment
McQuay International
The above are just a few engineering manfacturer's who have Revit content on their websites. If you are looking for additional content that is ... you can find it on Autodesk's Seek website, based on their Metadata Style Guide. Manufacturers are directed to their own site, which will assist them in creating their content and working with the Autodesk Seek specialists to upload it to the website.
With the economy the way it is, marketing funds are scarce these days...manufacturers can take advantage of the multitude of engineers that will be directed to the site directly from Revit MEP when the equipment needed is entered in the program itself.
Speak to your manufacturers, let them know the importance of creating content for engineers using Revit MEP. The more engineers that discuss their needs with their manufacturers, the more likely these manufacturers will create their content in Revit for your use.
It is up to you. Let's work together to improve the content, and the amount of content created for the Revit products.
Wednesday, April 22, 2009
Newest Product Add-Ons from Autodesk Subscriptions
Starting March 2009, Autodesk has begun to upload extensions and add-on programs to the 2010 versions or Revit. To learn more about Subscription, go to the Autodesk website. To become a subscription memeber today, contact your current Account Manager. The following are the most up-to-date Revit Add-Ons:
1) Model Performance Technical Note for Autodesk Revit 2010
The Revit platform's performance can depend as much on the knowledge, skill, and practices of its users as on the hardware environment provided for the software. To address both of these areas, the Revit platform team has assembled this collection of hardware requirements, recommendations, and modeling best practices as researched by both internal development and our community of dedicated customers.
2) Revit Extensions for Autodesk Revit MEP 2010
Revit® Extensions are a series of easy-to-use applications that extend the capabilities of Autodesk® Revit® MEP 2010 software in key areas, including modeling, coordination, and documentation. Specifically, the extensions provided in this executable file are: Freeze Drawings, Compare Models, Text Generator, and Elements Positioning.
3) Revit Extensions for Autodesk Revit Structure 2010
Revit® Extensions are a series of easy-to-use applications that extend the capabilities of the Autodesk® Revit® Structure 2010 software in key areas, including structural analysis, modeling, concrete reinforcement, interoperability, and construction documentation.
4) Bridge Toolkit for Autodesk Revit Structure 2010
The Bridge Toolkit for Autodesk® Revit® Structure 2010 software provides information, tools, content, and datasets that will better enable structural engineers and drafters to address infrastructure build-out as it relates to bridges. Specific components include:
-Box Girder Methodology and Datasets
-Bridge Components .rfa Content
-Precast Girder Methodology and Datasets
-Bridge Modeling Using Autodesk Revit Structure 2010 (Tips and Tricks)
5) Worksharing Monitor for Autodesk Revit 2010
Worksharing Monitor facilitates the use of Autodesk® Revit® Architecture 2010, Autodesk® Revit® Structure 2010, or Autodesk® Revit® MEP 2010 software in a worksharing environment, in which multiple people work on one project. For workshared projects, Worksharing Monitor answers questions such as:
-Who is currently working on this project?
-Is my local copy of the project up-to-date?
-When will my Save to Central operation finish?
-Has my request to borrow elements been granted?
-Are any issues interfering with my work on a Revit software project?
6) Batch Print for Autodesk Revit 2010
Batch Print provides an easy way to print a large number of drawings (views and sheets) from a Autodesk® Revit® Architecture 2010, Autodesk® Revit® Structure 2010, or Autodesk® Revit® MEP 2010 software project.
After preparing the default printer and the Revit software project, use Batch Print to send any number of drawings to the printer and to control the order in which they print. When you start the print job, Batch Print manages the printing of the drawings, requiring no further interaction from you. If desired, you can monitor the progress of the print job using a status dialog.
7) Revit Extensions for Autodesk Revit Architecture 2010
Revit® Extensions are a series of easy-to-use applications that extend the capabilities of Autodesk® Revit® Architecture 2010 software in key areas, including modeling, coordination, and documentation. Specifically, the extensions provided in this executable file are: Grid Generator, Freeze Drawings, Compare Models, Text Generator, Elements Positioning, and Microsoft Excel®-based Model Generation.
8) Globe Link for Autodesk Revit 2010
Globe Link for Revit 2010 platform products helps users streamline preliminary project planning processes by allowing them to present to clients conceptual designs in context with information about the project site.
With Globe Link, users can publish 3D building information models directly from Autodesk® Revit® Architecture 2010, Autodesk® Revit® Structure 2010, and Autodesk® Revit® MEP 2010 software into Google Earth™ mapping service. Users can also acquire site information from Google Earth mapping service and import it into Revit 2010 software applications for building and site layout purposes. Globe Link is optimized for Google Earth version 4 mapping service.
9) Robot Extensions for Autodesk Robot Structural Analysis 2010
Robot™ Extensions unite the power of Autodesk® Revit® Structure 2010 software and Autodesk® Robot™ Structural Analysis 2010 software. Structural engineers can now perform analysis and design calculations of composite steel beams to help meet US design codes and load takedown simulations to help calculate the flow of forces through a structure resulting from applied loads all within a Revit Structure 2010 design model.
*Robot Extensions will only run when a valid copy of Autodesk Robot Structural Analysis, Autodesk Robot Structural Analysis Professional, or a trial version is present on the same machine.
Tuesday, April 29, 2008
Back to Basics
Many of you may already know this, but I have been asked this questions several times, and I thought I would address it:
What is the difference between Auto-Detect or Inch when importing in an AutoCAD file?
The difference is that you may have actually selected a different scale in the AutoCAD drawing other than the default inch. Many users will change the drawing to metric, feet, or a different type of scale all together.
Sometimes we just need to go Back to the Basics :-)
Wednesday, March 12, 2008
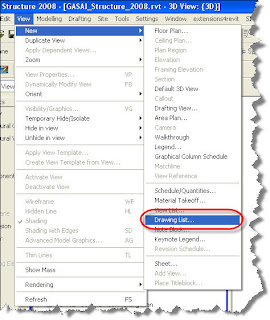
Using Drawing List to Speed Up Productivity
In larger firms, it is most likely that multiple people will be working in the same file, and creating separate sheets, needing the Checked By, Drawn By, and Approved By to have a different set of initials. However, in smaller firms, one designer may be working on creating all the sheets, working on all the plans, sections, details, etc. This can make for a very timely process when this information needs to be entered in for every sheet, everytime a new sheet is created. However, utilizing the Drawing List, even if not in the actual final set of Construction Documents, may com in handy here:
First, create a new Drawing List:
First, create a new Drawing List:

Second, add the necessary Fields/Parameters, as if you were creating a schedule:
Lastly, change the necessary information in the Drawing List, rather than in each individual Sheet…
Thursday, February 28, 2008
Plan Region – Overview
The Plan Region command lets you define a region within a plan view that has a different view range from the overall view. Plan regions are useful for split level plans or for displaying inserts above or below the cut plane. Plan regions are closed sketches and cannot overlap one another. They can have coincident edges.
Plan regions are view-specific. You can copy and paste them into the same view or different views. When you copy a plan region into a different view, the view range settings are maintained from the previous view.
Plan regions export and print when they are visible in a view.
Creating a Plan Region
1. Open a plan view.
2. Click View menu>New>Plan Region, or on the View tab of the Design Bar, click Plan Region.
3. You will now be directed into a Sketch Mode. Sketch a closed loop using lines, rectangles, or polygons. Note: When in Sketch Mode, you have to create a closed loop, otherwise, you will receive an error.
4. On the Design Bar, click Region Properties.
5. In the Element Properties dialog, for View Range, click Edit.
6. In the View Range dialog, specify the primary range and view depth. If the value for Cut Plane is specified as Parent View’s Level, then the level used to define all the clip planes (Top, Bottom, Cut, and View Depth) is the same as for the entire plan view.
NOTE: Values for offsets need to make sense with respect to one another. For example, the top offset cannot be lower than the cut plane offset, and the cut plane offset cannot be lower than the bottom offset.
8. Click Finish Sketch.
You do not have to enter sketch mode to edit the shape of a plan region. Each boundary line of the plan region is a shape handle, as shown in the following image. Select the shape handle and drag it to modify the size.
Controlling Visibility of the Plan Region
1. Click View menu>Visibility/Graphics, or type the shortcut key combination VG.
2. In the Visibility/Graphics dialog, click the Annotation Categories tab.
3. Scroll to the Plan Region category.
4. Select or clear the check box to show or hide the plan region.
5. Click in the Project/Surface Lines column, and click Override to make changes to the line weight, line color, and line pattern of the plan region.
6. Click OK.
Friday, August 31, 2007
How Do You Add a Revision Schedule?
Adding a Revision Schedule to a Custom Titleblock
1. Click File menu> New Titleblock.
2. Select the appropriate titleblock template, and click Open.
3. Sketch borders, and then add text as desired.
4. Sketch a border for the revision schedule area.
5. Click View menu> New Revision Schedule.
6. In the Revision Properties dialog, add the fields you want included in the schedule. The data for the available fields comes from the revision clouds that you add to the project.
7. Apply any sorting, formatting, or appearance parameters to the schedule. For more information on these tabs, see Specifying Schedule Properties.
8. Click OK to create the schedule.
9. In the Project Browser, expand Sheets.
10. To open the sheet view, double-click the node under Sheets.
11. In the Project Browser, expand Schedules.
12. Select the Revision Schedule, and drag it to the desired location.
13. Save the titleblock family and load it into the project.
Subscribe to:
Posts (Atom)
My Blog List
-
-
Revit 2026 is Released5 months ago
-
-
BIM and Beam blog has been moved9 years ago
-
-
-
Introducing Autodesk Insight 3609 years ago
-
Turning the Page10 years ago
-
-
I've MOVED13 years ago
-
-
Revit Inside - Architecture18 years ago
-